Category: Fitness

  • How to get GPX Files from the Strava API – strava2gpx (Python)

    How to get GPX Files from the Strava API – strava2gpx (Python)

    The current Strava API does not allow for users to request activities in the form of a gpx file. The strava2gpx package for Python uses the Strava API to pull data streams which it then compiles into GPX files, effectively allowing users to get GPX files from the Strava API. This tutorial will cover usage of the strava2gpx package in Python.

    Before beginning, it is important to note that gpx files deal with gps data, so Strava activities that do not have gps data, currently will not work with the strava2gpx package. (eg. Yoga, Weightlifting, Pool Swimming, etc.)

    Why not use strava.com/activities/id/export_gpx?

    Will this get heartrate data?

    Installing strava2gpx

    The strava2gpx Python package is available through PyPi and can be downloaded easily by running the following command in your development environment:

    pip install strava2gpx
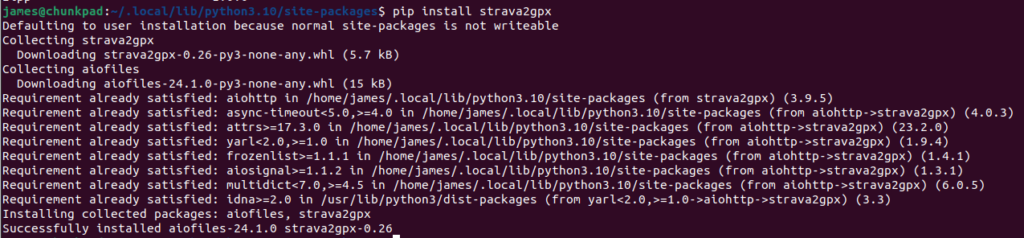
    strava2gpx installation in terminal
    strava2gpx installation in terminal

    If you already have your credentials for Strava API access you can skip this section. Go to https://www.strava.com/settings/api and if you have not already, go through the steps to create an app there. Eventually, you should get to a screen that looks like this:

    Strava Api Application Page

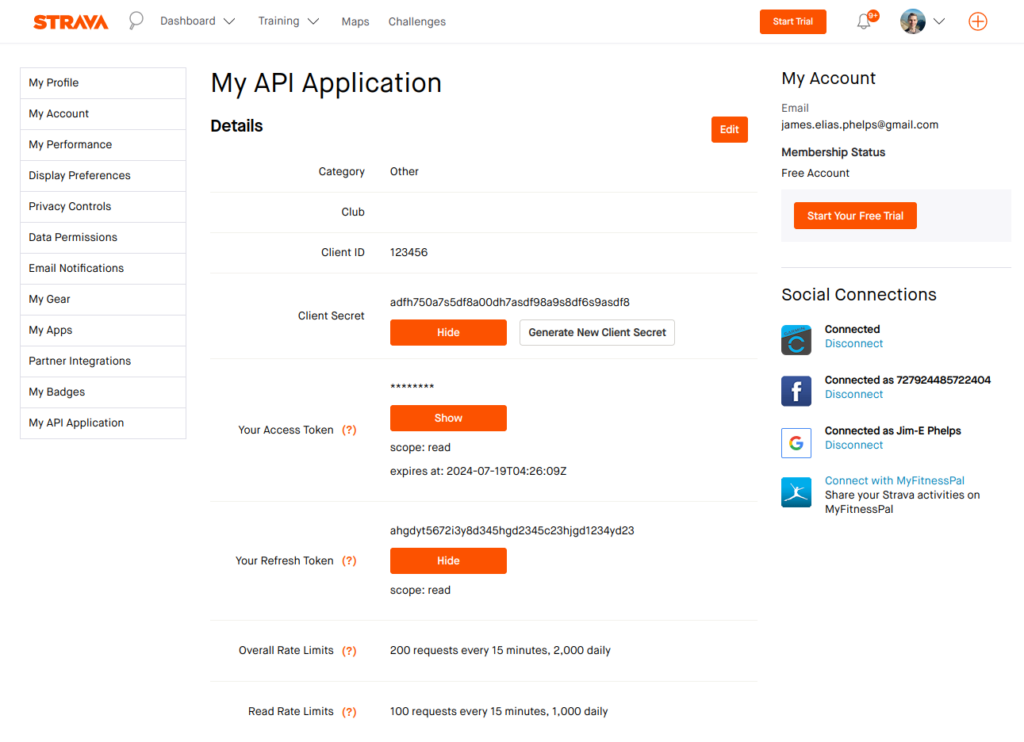
    The information that we are interested in is the Client ID, Client Secret, and the Refresh Token. Copy those down in a safe spot and don’t share them.

    Next go to the following url and replace YOUR_CLIENT_ID with the Client ID that we just copied down.

    https://www.strava.com/oauth/authorize?client_id=[YOUR_CLIENT_ID]&response_type=code&redirect_uri=http://localhost/exchange_token&approval_prompt=force&scope=activity:read_all
    

    That will open a page that looks like this:

    We are interested in the code part of the url that it redirected to, which in this example is the part that says “9ds8fg340vss0f98sd3fdefwfs.” Copy that down as well. That will be YOUR_AUTH_CODE that we use later.

    Now run the following curl command in the terminal, being sure to replace the YOUR_CLIENT_ID, YOUR_CLIENT_SECRET, and YOUR_AUTHORIZATION_CODE with the values we have previously retrieved:

    curl -X POST https://www.strava.com/oauth/token \
      -d client_id=YOUR_CLIENT_ID \
      -d client_secret=YOUR_CLIENT_SECRET \
      -d code=YOUR_AUTHORIZATION_CODE \
      -d grant_type=authorization_code

    That should return a json that has your athlete information and a refresh_token and an access_token.

    {
      "access_token": "your_access_token",
      "refresh_token": "your_refresh_token",
      ...
    }
    

    Copy down this new refresh_token for the next section.

    Getting the GPX File in Python

    Copy the code below into your code editor and replace client_id, client_secret, and refresh_token with their respective values you copied in the previous section from the Strava API. The client_id and client_secret come from the Strava API page and the refresh_token comes from the various web requests we made.

    from strava2gpx import strava2gpx
    import asyncio
    
    async def main():
        '''
        put in your Strava Api client_id, refresh_token, and client_secret
        '''
        client_id = '123456'
        refresh_token = 'adfh750a7s5df8a00dh7asdf98a9s8df6s9asdf8'
        client_secret = 'ahgdyt5672i3y8d345hgd2345c23hjgd1234yd23'
    
        # create an instance of strava2gpx
        s2g = strava2gpx(client_id, client_secret, refresh_token)
    
        # connect to the Strava API
        await s2g.connect()
    
        # write activity to output.gpx by activity id
        await s2g.write_to_gpx(11893637629, "output")
    
    if __name__ == '__main__':
        asyncio.run(main())

    On the line

    # write activity to output.gpx by activity id
        await s2g.write_to_gpx(11893637629, "output")

    you can replace the number (11893637629) with one of your own Strava activity IDs which can be found in the url when looking at them in Strava. (Ex: strava.com/activities/11893637629) This will pull the data from that activity and then compile it into a file called output.gpx. You can change the name of the file by editing the second argument where it currently reads “output”.

    Save the python file as strava2gpx.py and run it in the terminal with the following command

    python3 strava2gpx.py

    When the program has run to completion, you will have an “output.gpx” file in the same directory. This file can be uploaded to other services like Garmin Connect and similar and contains all data like heartrate, power, etc.

    The package provides an additional function called get_activities_list() which will get a list of all the user’s data and store it in a list of lists where each element is in the following format:

    [name, id, start_date, type]
    ex:
    ['Fun Run', 11893637629, '2024-07-15T11:50:49Z', 'Run']

    This gives room for bulk processing of activities using custom actions like using date-time to choose what activities are processed or naming them by id and whatnot. Below is an example of calling the function.

    from strava2gpx import strava2gpx
    import asyncio
    
    async def main():
        '''
        put in your Strava Api client_id, refresh_token, and client_secret
        '''
        client_id = '123456'
        refresh_token = 'adfh750a7s5df8a00dh7asdf98a9s8df6s9asdf8'
        client_secret = 'ahgdyt5672i3y8d345hgd2345c23hjgd1234yd23'
    
        # create an instance of strava2gpx
        s2g = strava2gpx(client_id, client_secret, refresh_token)
    
        # connect to the Strava API
        await s2g.connect()
    
        # get a list of all user's Strava activities
      activities_list = await s2g.get_activities_list()  
      print(activities_list[0:5])
    
    if __name__ == '__main__':
        asyncio.run(main())

    The above code would generate the following output:

    [
        ['Legs may be sore', 11910466229, '2024-07-17T11:57:21Z', 'Ride'],
        ['Tall Grass, Hidden Dirt', 11906994862, '2024-07-17T00:10:57Z', 'Ride'],
        ['A little thunder there, a little MTB here', 11898361818, '2024-07-16T01:16:13Z', 'Ride'],
        ['Morning Run', 11893637629, '2024-07-15T11:50:49Z', 'Run'],
        ['Afternoon Yoga', 11880523323, '2024-07-13T19:09:04Z', 'Yoga']
    ]
  • Holmes Cabin – Kaysville, UT

    Holmes Cabin – Kaysville, UT

    Holme’s Cabin is a lesser known cabin located about halfway up the mountains East of Kaysville. It is accessible starting from the Kaysville East Wilderness Park trailhead and involves climbing 2800 feet of elevation in about three miles making it a very steep hike or run. It is on the ridge South of Adam’s Canyon and North of its namesake Holmes Creek.

    Starting the Journey

    The closest place to park is at East Mountain Wilderness Park. From there, you can travel up the dirt road until you get to the turn off for the Bonneville Shoreline Trail. Keep north on the trail, going past the bridge until you get to this point pictured below and also marked here on google maps.

    The fork in the path towards Holmes' cabin

    At the blue marker pointing left for BST, you will want to take a right to start going up the mountain. The next section of trail is crossed by a lot of other smaller foot paths through the sage brush. A good rule of thumb for keeping on the right path is that you should always be heading up the mountain. There are no downhills and the path does not cut across the mountain to make the way less steep.

    The trek to the cabin is not a lot of mileage, but the steep trail conditions can make it take many hours. If done in the winter, expect considerable snow.

    James in snow up to his knees

    In snowy conditions it is particularly difficult to find the trail since it is not typically well traveled. In this last winter I had to consult maps on my watch very frequently to keep on the right track towards the end of the run.

    The Cabin

    Of the Davis County cabins, Holmes cabin is a sturdy contender. It is not as robust as its neighbor Adam’s cabin, but it is in far better condition than Fernwood cabin which at this point I am guessing has collapsed. Holmes cabin has quite a lot of provisions, though don’t expect free food. The cans of food that were there earlier this year expired in 2014. There are enough supplies to start a fire though if needed. Additionally, there are also sleeping bags hanging from the rafters.

    Sleeping bags hanging in Holmes' cabin
    Some Sleeping Bags

    Years ago there was a blog post about some winter backpackers who stayed the night at Holmes cabin. That blog seems to have since gone offline, but to my remembrance they appeared to have had an enjoyable time staying the night. It is important to note, that like the other cabins, you do have to worry about rodent droppings. Squirrels and mice are frequent inhabitants of these cabins and they leave stuff everywhere. The first time I visited Holmes cabin, I opened the door and squirrels went scurrying out from everywhere much to the delight of my dog.

    Racer resting at Holmes Cabin
    Racer resting at Holmes Cabin

    Holmes Cabin Pictures

  • Fremont Island: A run across the lake

    Fremont Island: A run across the lake

    A bit of history

    Despite being a relatively sparse wasteland, Fremont Island has a decently interesting history. Located 6 miles northwest from the far more popular Antelope Island, Fremont Island is a standing record of the island’s few visitors through the centuries. Hundreds of years ago, Native Americans used the island for different plants and resources. They left behind a few artifacts including some petroglyphs. In the preceding two centuries, white explorers and settlers have added their mark on the island. Explorers John C. Fremont and Kit Carson visited the island in 1843 and Kit Carson etched a cross into a rock that is still visible today.

    Kit Carson’s Cross on Castle Rock

    After the pioneers arrived in the Utah area, the island was used for various purposes including mining, sheep herding, and once Brigham Young even exiled a grave robber to the island for his crimes. The only known long term residents of the island have been the Wenner family who owned the island from 1886 to 1960. Uriah Wenner, a Salt Lake County judge, bought the island from the Union Pacific in hopes that the salty air would help him handle his tuberculosis. (History of the Wenner Family)

    Today the island is owned by the State of Utah and is publicly accessible by foot or biking. Motorized vehicles are not allowed and camping is also prohibited in order to preserve the island.

    Getting to the island

    I made my journey to the island mid-August 2023. That day, there were heavy rainstorms sweeping across the lake. As I drove across the causeway, rain pounded my vehicle and I started to wonder if I would be able to make the run. Visibility was low and I could not see the island, just a wall of white to the north. I parked at the U.S. Army Ranger and Air Force Memorial and ran two miles back on the causeway.

    I hopped off the causeway and started running on the sandbar which was starting to fill up with water. Every step I sank into the increasingly muddy mess. The mud suctioned around my feet making it good work to pull them back up with every pace. The smell of the Great Salt Lake resembles rotten eggs and the mud seemed then to be the very essence of it mixed with slimy somethings and decaying organic matter. Large swaths of gnats huddled on the sand, grounded by the weather.

    Had I not had a GPS device I would not have been able to discern the correct way to go because of the heavy rain. The island was definitely farther West than I had been thinking, but checking in every now and then with the GPS allowed me to keep heading the correct way. Usually, the island is easily visible so this is not a typical problem when making the trek.

    A view of my surroundings

    The obscured and uniform view in all directions was actually kind of a pleasant environment to run in. After an hour of steady plodding through the mud, the intensity of the rain started to abate and visibility started to increase.

    Because of the previous lack of visibility and rising water, I did end up running slightly off where the sandbar is supposed to be and into deeper waters for a while. On a sunny day this would be easily avoidable. The last mile to the island was me splashing through the water and trying not to fall. Though at this point, I could not get any wetter.

    Trudging through the last part

    I entered the island from the southeastern side where I was greeted by a trail camera monitoring the island’s visitors. There is a dirt road running along the edge that leads up to an old cabin structure built by Justin Barrow, a previous owner of the island who tried to make a private hunting business by bringing in exotic animals in the 2000’s.

    Justin Barrow Cabin

    From the cabin, I ran up the road north to the top of David E. Miller hill where the University of Utah has a weather station. The next stretch from there is the island’s airstrip along the central ridge of the island.

    Basic Map of the Island
    U of U Weather Station, David E Miller Hill
    Windsock at the Airstrip

    All in all, the total running distance from Antelope Island to Castle Rock was about 12 miles. The final climb up to Castle Rock is very steep and may involve some clambering on all fours depending on the side of the hill. I approached from the east side and left on the north side. In my estimation there is not a side of the hill that is any easier than the others to climb. All are pretty steep.

    Castle Rock stands out well and Kit Carson’s cross is easy to locate on the east side of the rock. This marks the highest point of Fremont Island and provides a view of the surrounding lake and mountains.

    During my stay on the island, the rain had stopped and the water levels on the sandbar had fallen. On my return across the sandbar, I had pretty good weather for about a mile. The bugs took advantage of this for a little bit and were quite a nuisance, apparently attracted to my head. Along the way back I noticed there seems to be these wooden posts driven in the ground at various intervals marking the way to the island. If there is any bad weather though, they are pretty much invisible.

    Eventually the rain returned, although much lighter, but accompanied by very fierce winds. The last few miles getting off of the sand were very muddy and the unstable ground was starting to take a toll on my legs. All in all, the trip was a total 24 miles and well worth it. I will definitely return to the island, but probably in better weather. There is still more things to find and areas to explore.

    Useful resources

    Most comprehensive resource on the island:

    Fremont Island Property Management Plan

    How to get to the island:

    GeoSights: Trek to Fremont Island (Disappointment Island)

    A useful map with all of the various landmarks named

    Island History:

    Saline Stories: An Oral and Visual History of the Great Salt Lake

    The Wenner Family Enjoyed Life on Fremont Island

  • Cheaply Acquiring a GoPro (How to Fix Hero 8 Lens)

    Cheaply Acquiring a GoPro (How to Fix Hero 8 Lens)

    Now the first thing you want to do, is find a GoPro stand not out in the open. Take a thin strip of metal and stick it into the crack between the glass and…

    Research

    GoPro cameras are pretty nice, but they are also pretty expensive. Even buying older, refurbished models will still set you back a couple hundred dollars. This is the story of how I obtained one significantly cheaper than normal. (And also how to fix broken protective glass on the Hero 8)

    My target in this endeavor was the GoPro Hero 8 for a couple of specific reasons which I will cover. At the time of this writing, buying a Hero 8 is still over $200. In the end I ended up paying about $110 for one.

    The GoPro Hero 8 stands out from the other GoPro Hero models because it does not have a removable protective cover for the lens. This is normally considered the major downside of the Hero 8. Once it is cracked, most consider it a paperweight. GoPro themselves will not do repairs on Hero 8’s with cracked protective glass. Fortunately, this fact proved beneficial to me because is it is actually very easy to repair and relatively cheap.

    While, GoPro does not sell protective glass covers for the lens, Camera Butter, a company in British Columbia, manufactures such a glass cover. From appearances and my limited research, it appears to be on par with the original protective cover. It is made of Corning Gorilla glass and the company owner claims in this Reddit post, that the adhesive is the same as the original.

    Having identified the method of repair, I started to search the internet to find a “broken” GoPro Hero 8. Luckily, I was able to find one from a camera rental company fairly quickly. The description noted that its protective lens cover was completely shattered, ruining the functionality of the camera. I ended up purchasing this one despite it being more pricy, because it had a 30-day return period and the company was a lot more reliable than Ebay sellers.

    The total cost including shipping was about $110, but I was able to find a good promo code online that knocked it down to about $90. The camera came in its original packaging and included the normal accessories and charging cable. The camera plus the lens brought the total cost up to just under $110.

    Repair

    The first thing to do was remove the old broken glass and adhesive residue from the camera. This camera was so badly damaged, that the protective glass was already pretty broken off, so I could remove it easily.

    If the damaged lens cover is still fairly intact you can get it to come off by heating the adhesive up using a heat gun or hair dryer. Camera Butter has an instructional video and it is also demonstrated in this youtube video. You just have to heat it up for about a minute and a half and it will loosen up enough to let you pry it off.

    I removed the residue using a metal pen-like tip to scrape it off of the edges of the lens compartment.

    After removing that, there was a fair amount of glass dust and particles lingering on the lens as well as some scuffs. I used a soft brush to kick up the dust out of the cracks in conjunction with a lens pen to buff out the scuffs on the lens.

    Brushing Up the Dust

    A lot of dust had accumulated in the crack between the edge of the lens and the camera housing, but the brush was able to clean up those cracks nicely.

    Using the Lens Pen

    I then wiped it down using the cleaning wet and dry wipes that come with the Camera Butter lens kit. After that, I used some dust-removal stickers from an old phone screen protector to get any last remaining particles off of the lens area.

    Finally, the camera was ready for a new lens protector. The gorilla glass to be installed is 1mm thick, which doesn’t sound like a lot, but is actually pretty thick when you look at it from the side. The black edge is the thickness of the adhesive used to adhere the glass to the camera.

    The Lens Protector from the Side

    Using two more dust-removal stickers, I positioned the glass over the camera body and then lowered it straight down, firmly pressing the sides in. It was a perfect fit and stuck fast to the surface of the camera. With how thick the glass is, you could also easily grip the sides and slip it into position without the aid of the dust-removal stickers.

    Having seen a decent amount of evidence that the lens protection glass can break, I installed a screen protector on the GoPro much like you would on your phone screen or camera.

    Result

    In the end, I ended up with a completely intact and functioning GoPro. Other than the smashed lens cover, everything else on this camera was in good condition. Both screens are flawless and the camera functions operate well.

    In this case, it was a success, but it is important to remember that a GoPro that has had its lens broken, probably received a substantial hit and might have other unseen damage. It is important to keep this in mind when looking for one that might be repairable. Before I bought this specific one, I emailed the business and asked them to verify that everything else on the camera was working before I bought it.

    At the moment, I am not doing anything I would use the GoPro for, so I have yet to rigorously test it. However, from my limited usage of it, the quality seems good and I am excited to see what it can do.

  • Installing Garmin SDK in Ubuntu 22.04

    Installing Garmin SDK in Ubuntu 22.04

    The steps to setting up a development for Garmin IQ in the past for Ubuntu 20+ have had some issues with library dependencies, but these seem to have been cleared up in the recent updates. This article will go over how to easily setup the simulator for Garmin devices in conjunction with VSCode on Ubuntu 22.04.

    1. Download the SDK

    Install the SDK Manager Page

    Visit https://developer.garmin.com/connect-iq/sdk/ and read the license agreement. Then accept and download the APK for Linux. It will download a zip file. Extract this to get the bin and share folders. I recommend extracting it to a location outside of your downloads folder so they are not lost later.

    Once extracted open the bin folder and double click on the file named ‘sdkmanager.’ This should open a GUI that will download the SDK and devices. If you can not run the executable file you can give it permission to run by right clicking sdkmanager>Poperties>Permission and checking the box next to Execute: Allow Executing File as Program. Or you can navigate to the parent directory in the terminal and use the following command:

    sudo chmod +x sdkmanager
    The File Manager

    Once the GUI opens up click Use as SDK next to one of the SDK options. You may have to drag the window size out to see the option. You can also manage the Garmin devices it downloads in the Devices tab.

    2. Install Monkey C in VSCode

    Assuming you have Visual Code Studio installed, open it up and navigate to extensions in the left sidebar. Search for “Monkey C.” Select the option by Garmin and install it.

    Monkey C is an object oriented programming language created by Garmin for their IQ Connect ecosystem. You can program watchfaces, apps, widgets, and data fields using it. It is meant to be easy to learn and similar to other familiar programming languages. You can read more about it here and get the documentation.

    3. Start a Project

    Create a folder in which you can store your Monkey C project. Open the folder up in VSCode. Now hit Ctrl+Shift+P. This will open up a command search. Search for the Monkey C: New Project Command.

    VSCode Command Prompt

    Follow the prompts to give your project a name, select type as watchface, select simple, and then version 3.0.0. Make sure to put the project in the newly created directory.

    VSCode open to GarminApp.mc

    You should now have a file structure built with a Resources folder, Source folder, and a manifest.xml file and a monkey.jungle file.

    4. Create Developer Key

    Before we can run the watchface on the simulator, we need to make a developer key. Type Ctrl+Shift+P again to pull up the command search. Search for “Monkey C: Generate a Developer Key.” It should open up a file manager screen from which you can choose a location for your key to be stored.

    Developer key has been set notification

    Once you select the folder it will display a message like the one above in the bottom right of the screen. You are now ready to test run the watchface on the simulator.

    5. Run the Watchface on Simulator

    Type Ctrl+Shift+P once again and search for the command “Monkey C: Edit Products.”

    VSCode Command Prompt open

    Find a watch model from the resulting drop-down menu and click on the checkbox next to it. This will set it as the target device for use in the simulator. Now navigate to the GarminApp.mc file in the Source folder using the file manager sidebar on the left.

    Go to the top and click on Run>Run without Debugging. If all goes well, it should take a few seconds to open the simulator and run the watchface. Your development environment is now all set!

    Garmin simulator in VSCode
  • Garmin: Custom Watchfaces

    Garmin: Custom Watchfaces

    There are a couple of methods for creating custom watchfaces for Garmin watches, but most are not great. In this post, we will quickly review three methods, focusing at the end on what is in my opinion the best and easiest tool for watchface creation.

    Connect IQ App

    The intended creation method by Garmin for the average user is through their Connect IQ app. From the app you can choose from a large selection of premade watchfaces and there are limited options for making your own. If you tap on the Face It tab down on the bottom, it lets you select an image from your phone and then put a clock overlay over it. There is not a ton of variation you can get with this, but it is simple and very intuitive.

    Monkey C and Garmin SDK

    Garmin’s provided SDK allows developers to make apps, watchfaces, datafields, and widgets. To their credit, the SDK is available on most operating systems, including Linux. It uses their own object-oriented programming language called Monkey C, that for developers is very intuitive. This is how those nice premade watchfaces in the Connect IQ store are made. The only problem is the normal Garmin user most likely does not have the skill set to program their own watchface. But not all is lost.

    Watchface Builder for Garmin

    Enter Watchface Builder for Garmin. Watchface Builder is an online tool developed by user Josh Hu. It has a very large selection of watchfaces that other users have made available for download.

    Its main feature, the Builder, lets you create custom watchfaces using a drag and drop interface. You can add in many data fields which will update dynamically throughout the day with your latest health statistics. You can even upload custom images or choose from its library of images. Simply start a new build and select the model of watch you have. It is super easy to use and gives tons of creative freedom.

    Once you have finished designing, clicking build in the top right will load your design and take you to your watchface’s description page. From there you can download your watchface as a zip file.

    To load your new watchface, connect your watch to the computer using its charging cable. Navigate into your watch’s apps folder by going to /Garmin/Apps. Extract from the downloaded zip file to get the .prg file. Copy this .prg file over to the watch’s apps folder. Disconnect the watch and when it loads up again, it will have your custom watchface. That is all.

    Note: When designing your watchface, it is important to know that the more data it has to display and update, the more it will your drain your battery. A simpler watchface might be more suitable for you if long battery life is important to you.